
How to record motion capture
Motion capture is a tricky thing. It’s something that has gone from a niche, expensive process achievable by only the biggest and most well-funded studios to something that can be done from your living room.
Today, techniques are available from a variety of manufacturers at a range of costs - affordable to all. The hardware is accessible, sure, but how do you capture the best, production quality data for your project? What I’ll break down below is a step-by-step process for capturing data for your humanoid character.
First off, you need some capture hardware. There’s two main options for this - either an inertial suit (which uses data from inertial measurement units (IMUs) placed over the body to determine your movement) or an optical system (which uses cameras - either infrared or RGB) placed around the capture volume to track various parts of the body.
Inertial Capture
These capture systems come at a variety of prices. For an inertial system, you’ve got the choice of a Perception Neuron or Rokoko, up to the state-of-the-art Xsens which we use here at Unlimited Motion Ltd.

Some cheaper solutions experience magnetic interference - which leads to the character sliding around the floor or the limbs jittering. These suits can be repeatedly calibrated on-set to mitigate this but it’s virtually impossible to remove - making it difficult to produce production-quality data. We use a higher-end system at Unlimited Motion without these issues, so our data is the best quality ready for retargeting.
Hand Capture
You’ll also need some kind of hand capture - unless you’re looking to keyframe the hands. This is definitely something to consider if you can’t afford the cost of gloves - but if there’s a lot of important hand detail (such as piano playing) it would take more time than it’s worth.

This project that we worked on was of a monologue delivered in VR. Here, there was no hand capture performed on the actress - but because the fingers didn’t move that much (only to punctuate certain moments) the finger movements were keyframed in later to save on the client’s capture costs.
Options for gloves range from the Rokoko Smartgloves to the higher-end Stretchsense, which are used by Unlimited Motion.
Optical Capture
So that’s inertial systems, what about optical? Contrary to what some believe, there are affordable options for this.
There are single-camera based AI processors such as DeepMotion. While these will undoubtedly become more powerful in the future, at the minute they have a lot of limitations - including limited finger tracking as well as root motion issues which cause the character to move around in 3D space without the actor moving.
A step above this is a multi-cam setup driven by software such as Theia3D or ipiSoft. These work with multiple inexpensive RGB or depth cameras - ipiSoft for instance works with PlayStation Eyes and Kinects. The quality of data out of these does vary - and is highly dependent on the capture environment. For instance, ipiSoft needs bright, single colour clothing on the actor, and a strong, diffuse light over the capture environment - so can’t be easily used outside.

You’ll still need to smooth the data afterwards as well - sometimes a lot if it’s from a very noise image - but this solution can be great for producing quick movements for pre-vis, especially with multiple actors as the optical system delivers absolute positioning of both skeletons.
The highest end of optical capture is reserved for the big studios. Cameras produced by Vicon and Optitrack can be fairly pricy, and the smallest mocap stage will have 8 of these - the largest over 50.
A key advantage with this kind of capture is the accuracy of the data. It’s important to note what accuracy means here - as it’s different from quality. Accuracy would mean that if two people shake hands, the skeletons of each of their hands would match the real-world position. Quality would mean that their arms and hands don’t jitter as they move. Large-scale optical systems are able to track multiple actors as they move relative to each other with no drift of the digital character.
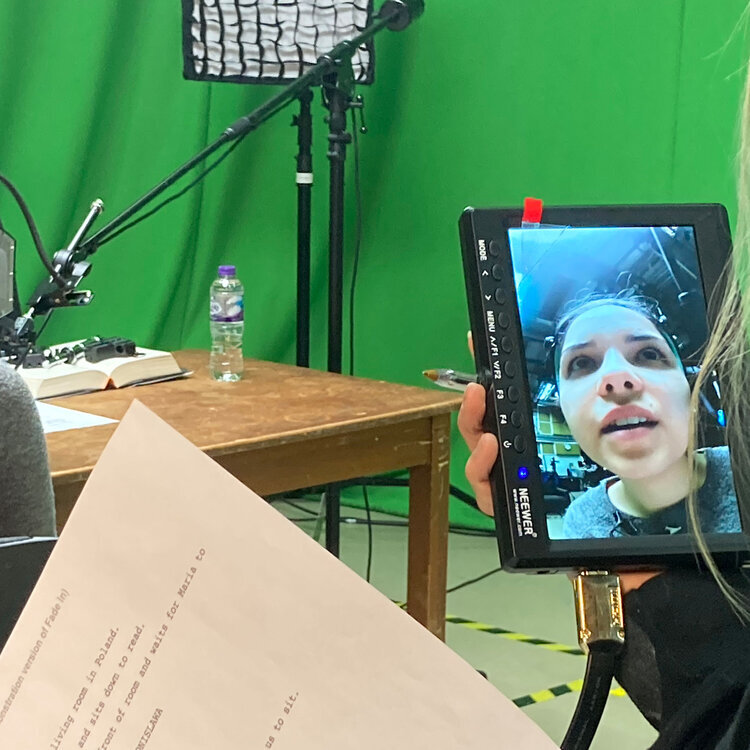
Facial Capture
Perhaps the most complex element to capture and process. At the bare minimum, you can use a fixed camera on a tripod to capture to actor’s facial movements - but this is dependent on the actor not moving much - not ideal when you’re doing motion capture!
You’ll need a helmet - and there’s a few choices here. Faceware and Dynamixyz - the biggest makers of facial capture software - both also make helmets of varying price. There are some other suppliers who mainly sell to high-end VFX studios such as DI4D (who supply Fox VFX) and Standard Deviation (makers of helmets for WETA) - the latter is the choice here at Unlimited Motion Ltd.
I would recommend against making your own helmet for all by the most basic of tasks. This is because - if not balanced properly - it’s not going to stay stable and lead to poor-quality data, which is going to lead to a poor-quality result on your character.
The camera here will vary depending on what kind of helmet you’re using. You could decide not to capture a facial performance at all when recording body data - this is sometimes done on games where a different actor will be portraying the body movements vs the facial movements and voiceover.
The main choices will depend on what your post-processing looks like - you can use either an iPhone with FaceID capabilities or a simple GoPro or other action cam. Note that high-end helmets tend to use specific variety of action cam supporting timecode generators and sometimes infrared recording.
The iPhone will lead to a simpler production process as you can capture and stream the data live to your model. It is rather limited, however, given the simple capture and retargeting the iPhone does. It’s designed for animating Animoji’s so you’ll struggle to get it to perform well on photo-realistic characters if you’re wanting quality lip-sync.
For this you need is an action camera in front of the talent’s face. If you don’t need a live-streamed performance, you can record locally to an SD card. If you’re recording in a poorly-lit environment, you can get a helmet with LED illumination, or just add your own.
The Recording Process
And now, the fun begins! This isn’t a rundown of exactly what you need to do for every piece of hardware and software (or this article would be 10x the length!), but rather a general overview of the steps that most of these systems require.
First, you calibrate. For an inertial suit, this means t-posing, running through a few set poses, or walking a short distance for the sensors to orient themselves. Optical systems based on RGB cameras usually need you to define a capture volume (usually using a bright light that the cameras can triangulate), while on an already set up infrared stage the actors just need to t-pose (usually at the start and end of each recording).
For your recording volume, you’ll want to set up a few wide angle witness cams for an overview of the performer’s movements. This will be useful later when it comes to motion editing - as you’ll be able to see what the intent of the actor was compared to the data that came out.
If you’re recording both facial and body data you’re going to need to sync both the recording devices together. If you’re running an iPhone through the same capture software as the body data, you can set them both recording at once.
If you’re recording locally on an action camera - you’ve got a couple options. The first option is to use a timecode generator to embed a timecode in the body data and the facial recording - using this you can sync the two together. Alternatively, you can take the easy road - time-tested by indie filmmakers the world over. Clap. You’ll be able to see from the motion data and the audio waveform where the clap occurred, and you can sync both recordings from there.
Got a project?